Staging Tables
Staging tables provide a persistent landing zone where external systems — SSIS packages, ETL pipelines, or raw SQL scripts — can deposit data before it is loaded into production. Each entity can have its own staging table, giving administrators full control over validation, merge behavior, and error handling.
Enabling staging
- Navigate to Settings → Manage Models and click Edit on any entity.
- Open the Staging Config tab.
- Click Enable Staging.
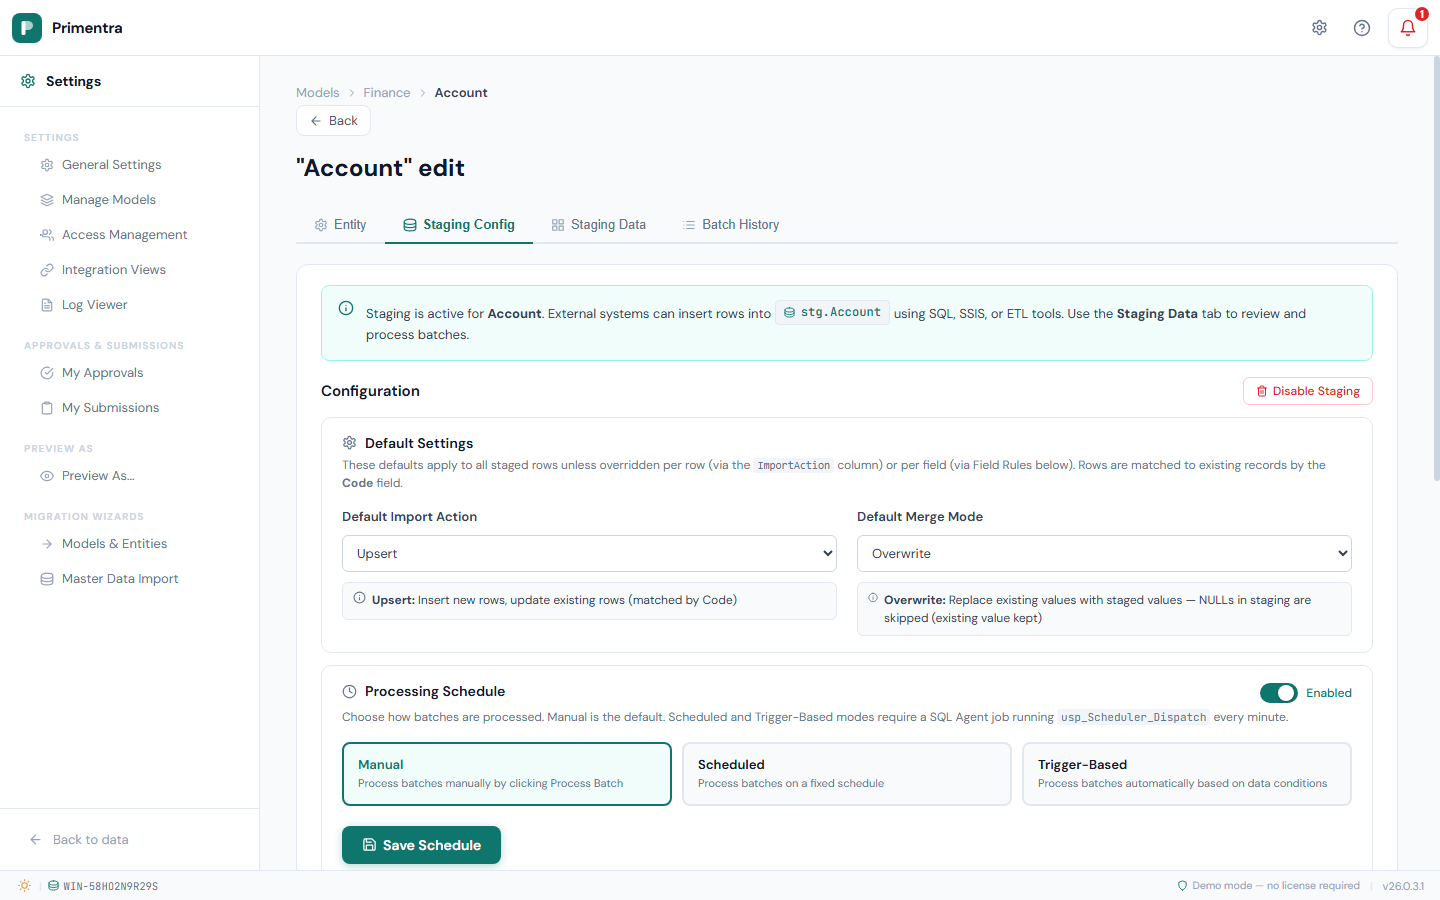
This creates a dedicated staging table in the stg schema named after the entity (e.g. stg.Currency, stg.Payment_Term). The banner at the top of the config tab shows the full table name.
Table structure
The staging table contains system columns plus one column per non-system attribute. All attribute columns are NVARCHAR(MAX) — the processing engine handles type conversion and validation.
System columns
| Column | Type | Description |
|---|---|---|
Id | BIGINT IDENTITY | Auto-generated row ID |
Code | NVARCHAR(255) | The entity code (business key) to insert, update, or delete |
Name | NVARCHAR(500) | The entity name |
NewCode | NVARCHAR(255) | Set this to rename a Code. The engine updates the existing row's Code to this value |
ImportAction | TINYINT | What operation to perform (see table below) |
ImportStatus | TINYINT | Processing status — set to 0 for new rows |
BatchId | INT | Assigned automatically during batch processing |
BatchTag | NVARCHAR(100) | Optional label for grouping rows in a batch |
ErrorCode | INT | Bitmask of error codes (set by the engine after processing) |
CreatedAt | DATETIME2 | Timestamp when the row was inserted |
Attribute columns
One column per entity attribute, named after the attribute name. Domain attributes (references to other entities) accept the code of the target entity — not the internal ID.
Inserting data
External systems write directly to the staging table using SQL:
ImportAction values
| Value | Action | Behavior |
|---|---|---|
0 | Upsert | Insert if Code does not exist, update if it does (default) |
1 | Insert only | Fail with error if Code already exists |
2 | Update only | Fail with error if Code does not exist |
3 | Delete | Remove the record. Fails if other entities reference it |
4 | Purge | Delete without cascade check |
5 | Delete cascade | Set domain references to NULL first, then delete |
6 | Purge cascade | Same as Delete cascade, but bypasses validation |
ImportStatus values
| Value | Meaning | When set |
|---|---|---|
0 | Ready | Set by the external system. Only rows with status 0 are picked up for processing |
1 | OK | Set by the engine after successful processing |
2 | Error | Set by the engine when processing fails. Check ErrorCode for details |
3 | Processing | Set briefly during batch execution |
ImportStatus = 0 when inserting new rows. The engine ignores rows with any other status.Domain attributes
For columns that reference another entity, insert the code of the target entity:
The processing engine resolves 'EUR' to the internal Currency row ID automatically. If the referenced code does not exist, the row fails with error code 8192 (Domain value not found).
Renaming a code
Use the NewCode column to rename an entity's business key:
This updates the existing USD row's Code to US-DOLLAR. The engine validates that NewCode does not already exist and that no duplicate NewCode values appear in the same batch.
Configuration
The Staging Config tab controls how staged data is validated and merged into production.
Default Import Action
The action applied when a staged row's ImportAction column is 0 or not set. Choose from the ImportAction values listed above. The default is Upsert.
Default Merge Mode
Controls how staged values merge with existing data during updates. Only relevant when the Import Action results in an update (Upsert or Update Only).
| Mode | Behavior |
|---|---|
| Overwrite | Replace existing values with staged values. NULL values in the staging row are skipped — existing data is preserved |
| Overwrite All | Replace existing values including NULLs. A NULL in the staging row clears the production field |
| Fill Empty | Only update fields that are currently NULL in production. Existing values are never overwritten |
| Ignore | Skip all fields. Use this with per-attribute Field Rules to selectively update specific columns |
| Overwrite with Sentinel | Like Overwrite, but a special sentinel value explicitly sets a field to NULL (see Sentinel Values below) |
When the Import Action is Delete, Purge, or one of their cascade variants, the merge mode selector is disabled — there is nothing to merge when deleting rows.
Sentinel values
Sentinel values solve a common ETL problem: how do you explicitly set a field to NULL when the staging column is NVARCHAR(MAX) and an actual NULL means "don't touch this field"?
When using the Overwrite with Sentinel merge mode, the engine checks each value against the configured sentinel. If it matches, the production field is set to NULL.
| Type | Default sentinel | Applied to |
|---|---|---|
| Text | ~NULL~ | Text, Domain, and Boolean columns |
| Number | -98765432101234567890 | Integer and Decimal columns |
| DateTime | 5555-11-22T12:34:56 | DateTime columns |
You can change these defaults in the Sentinel Values section (collapsed by default, under the Processing Schedule).
Field rules
Override the default merge mode and error handling for individual attributes.
Each attribute row has two settings:
- Merge Mode —
Auto(inherit the entity default), or any of the five merge modes listed above. This lets you, for example, set the entity default to Overwrite but mark specific sensitive fields as Fill Empty. - On Error — what happens when validation fails for this field:
- *Error Row* — the entire row is marked as failed (default behavior)
- *Skip Field* — skip this field but continue processing the row. Useful for non-critical fields where partial updates are acceptable.
Viewing staged data
The Staging Data tab shows all rows currently in the staging table.
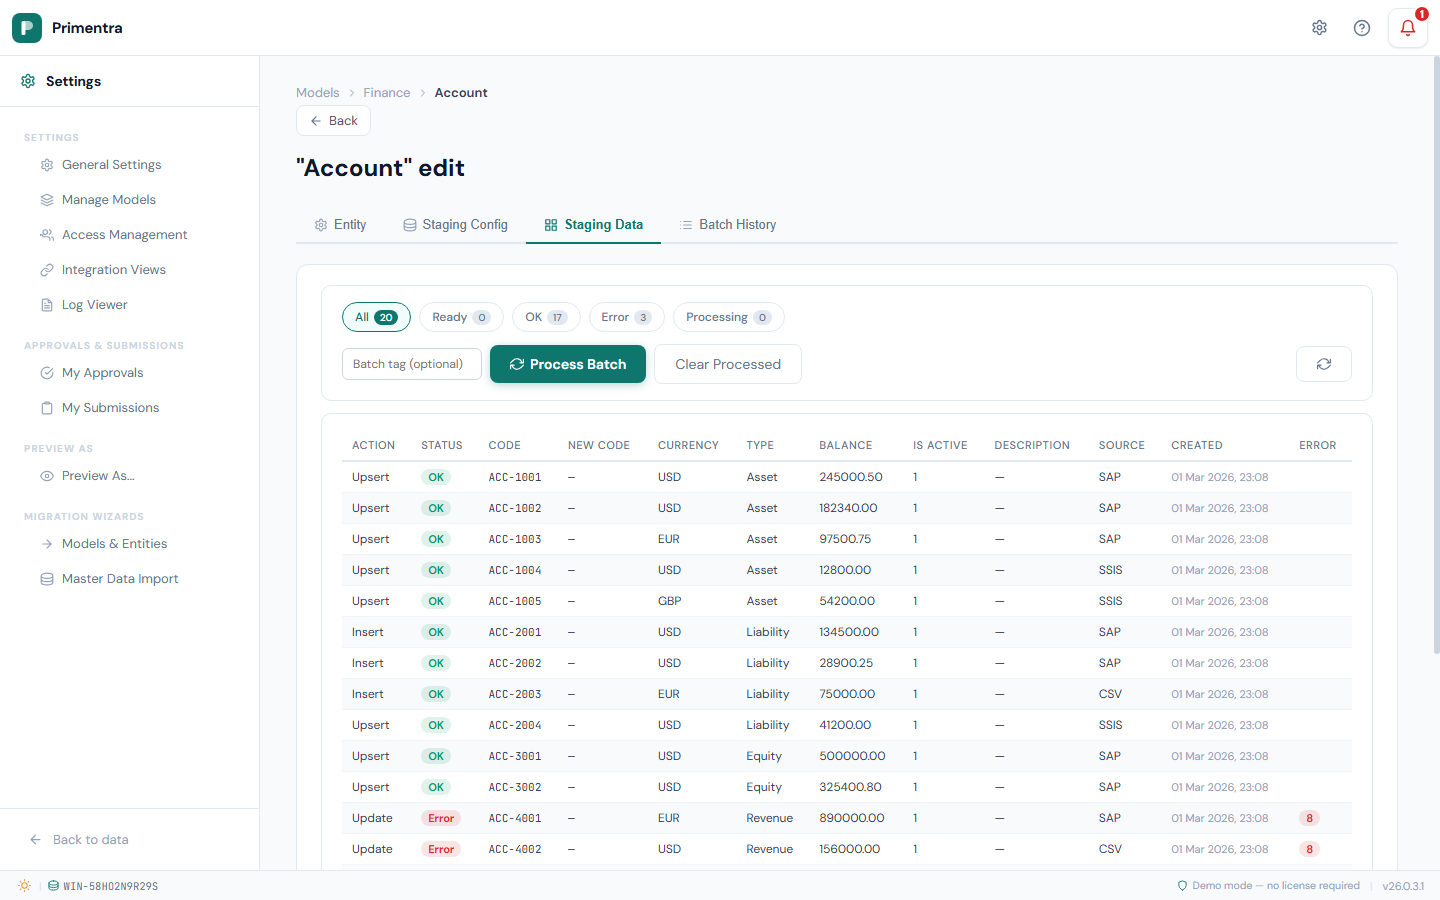
Status filters
Filter the view by processing status using the filter bar at the top:
- All — show all rows (with total count)
- Ready — unprocessed rows (
ImportStatus = 0) - OK — successfully processed rows (
ImportStatus = 1) - Error — rows that failed processing (
ImportStatus = 2) - Processing — rows currently being processed (
ImportStatus = 3)
Each filter button shows a count badge with the number of rows in that status.
The data grid
The grid displays system columns (Action, Status, Code, NewCode) followed by all entity attribute columns, then Source, Created, and Error.
- Status is shown as a color-coded badge: grey (Ready), green (OK), red (Error), blue (Processing)
- Error shows the error code as a red badge. Hover over the badge to see a tooltip with the human-readable error description
- The grid scrolls horizontally when there are many attributes
- Pages display 50 rows at a time with Prev/Next pagination
Processing a batch
- Open the Staging Data tab.
- Optionally enter a Batch Tag in the input field to label this processing run (e.g.
SSIS_2026-03-02,Q1_reconciliation). - Click Process Batch.
The engine processes all rows with ImportStatus = 0:
- Assigns a batch ID to all eligible rows
- Validates each row: required fields, data types, code uniqueness, domain references
- Applies the configured merge mode per field
- Executes the import action (insert, update, delete)
- Marks each row as OK (
1) or Error (2) with an error code bitmask
A progress bar shows the estimated progress during processing.
Clear processed rows
After processing, use the Clear Processed button to delete all rows with ImportStatus = 1 (OK) from the staging table. This keeps the table clean without losing error rows that may need investigation.
Error codes
When a row fails validation, the ErrorCode column is set to a bitmask. Multiple errors can occur on the same row — the codes are combined using bitwise OR.
Row-level errors
| Code | Name | Description |
|---|---|---|
1 | Duplicate Code | Two or more rows in the same batch have the same Code |
2 | Code required | The Code column is empty or NULL |
4 | Code already exists | Insert-only action, but the Code already exists in production |
8 | Code not found | Update/Delete action, but the Code does not exist in production |
16 | Invalid ImportAction | The ImportAction value is not recognized |
32 | Reserved Code | The Code is reserved and cannot be used |
64 | Delete blocked | Cannot delete because other entities reference this row |
Field-level errors
| Code | Name | Description |
|---|---|---|
128 | Required field empty | A required attribute has no value |
256 | Text too long | Text value exceeds the attribute's maximum length |
512 | Invalid integer | Value cannot be converted to an integer |
1024 | Invalid decimal | Value cannot be converted to a decimal number |
2048 | Invalid datetime | Value cannot be converted to a date/time |
4096 | Invalid boolean | Value is not a valid boolean (true/false, 1/0, yes/no) |
8192 | Domain not found | The referenced code does not exist in the target entity |
16384 | Domain inactive | The referenced code exists but is inactive |
Code rename errors
| Code | Name | Description |
|---|---|---|
32768 | NewCode already exists | The NewCode value already exists in production |
65536 | Duplicate NewCode | Two or more rows in the same batch have the same NewCode |
System errors
| Code | Name | Description |
|---|---|---|
131072 | Processing failed | An unexpected error occurred during row processing |
Reading combined error codes: If a row has ErrorCode = 130, that is 128 + 2 — meaning both "Required field empty" and "Code required" errors occurred.
Batch history
The Batch History tab shows all past processing runs. Click any batch row to expand the error detail panel.
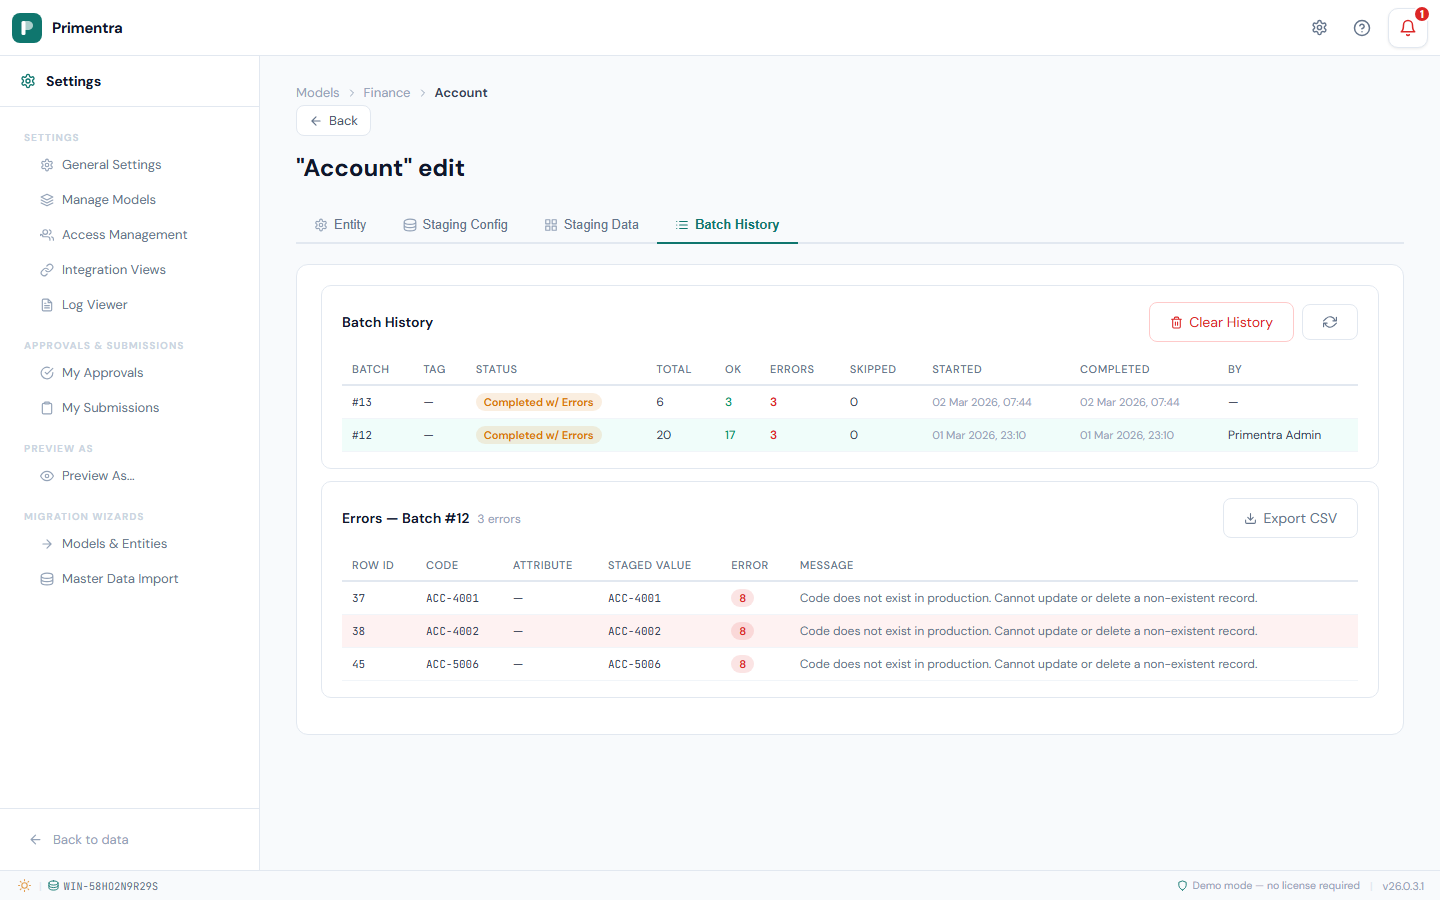
Batch list
Each batch row shows:
| Column | Description |
|---|---|
| Batch # | The batch ID |
| Tag | The batch tag (if one was provided) |
| Status | Queued, Running, Completed, Completed with Errors, or Failed |
| Total | Total number of rows in the batch |
| OK | Successfully processed rows (green) |
| Errors | Failed rows (red when > 0) |
| Skipped | Rows skipped during processing |
| Started | When processing started |
| Completed | When processing finished |
| By | The user who started the batch, or the scheduler trigger source |
Error details
Click any batch row to expand the error detail panel below it. This shows every failed row with:
- Row ID, Code, Attribute name, Staged value, Error code (badge), and Error message
- The error code badge shows the numeric code with a hover tooltip explaining the error
Click the same row again to collapse the error panel.
Export errors to CSV
When viewing errors for a batch, click Export CSV to download a CSV file containing all error rows. The file is named {entityName}_batch_{batchId}_errors.csv and includes columns: Row ID, Code, Attribute, Staged Value, Error Code, Message.
Clear history
Click Clear History (red button) to remove all completed and failed batch records. Running and queued batches are preserved. This also deletes the associated staging rows and error details for the cleared batches.
Rebuilding the staging table
When you add or remove attributes from an entity, the staging table becomes out of sync — new attributes have no column, and removed attributes leave orphan columns.
Click Rebuild Table on the Staging Config tab. The engine adds missing columns and drops removed ones. Existing staged data in unchanged columns is preserved.
Disabling staging
Click Disable Staging on the Staging Config tab. A confirmation dialog warns that this action:
- Drops the staging table permanently
- Deletes all unprocessed (staged) rows
Batch history records are preserved for audit purposes.