Entity Management
Entity Clone
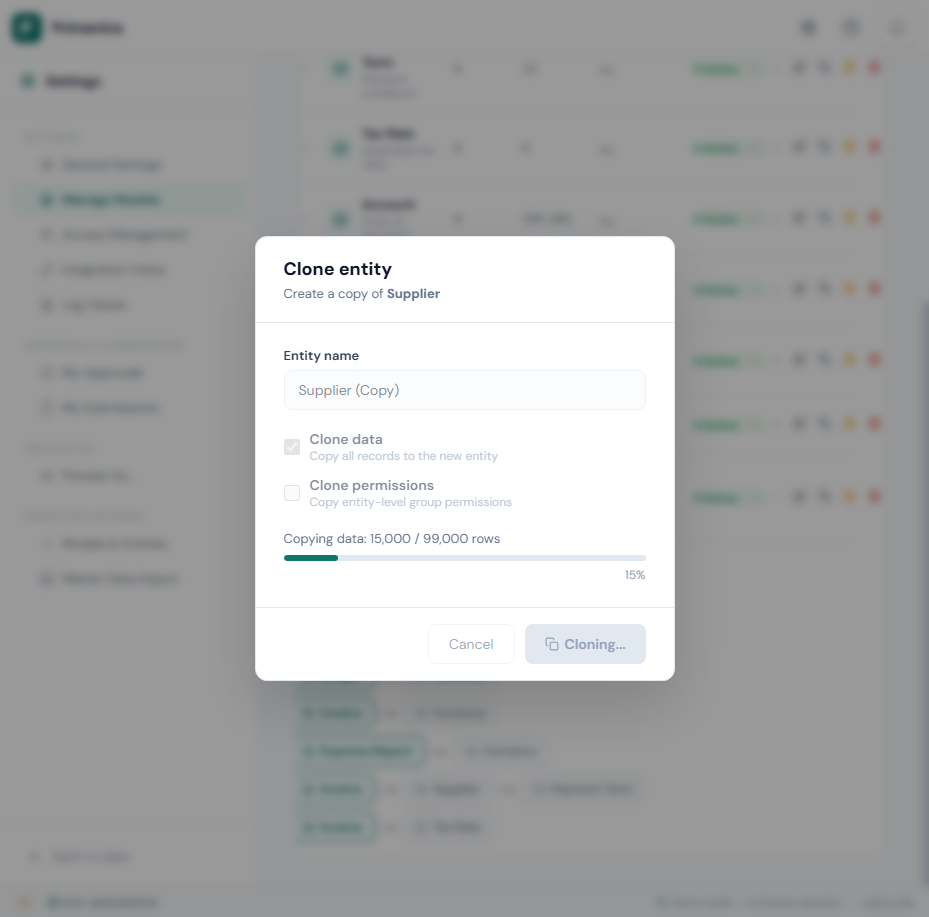
Duplicate an entity with a single click using the clone button (copy icon) on any entity in the Models list.
The clone dialog offers:
- New name — Enter a unique name for the clone
- Clone data (default: on) — Copy all data rows to the new entity
- Clone permissions (default: off) — Copy entity-level group permissions
All attributes, derived columns, and approvers are deep-cloned with new unique IDs. Domain attribute references within the same entity are automatically remapped to the cloned rows.
Real-time progress tracking — For large entities, a progress bar shows the exact number of rows copied (e.g. "Copying data: 15,000 / 99,000 rows") with a percentage indicator. Data is copied in batches so the operation never times out, even for entities with millions of rows.
The cloned entity appears immediately in the model's entity list with a confirmation showing the total rows copied.
Transaction log warning — For entities with 10,000+ rows, a blue info box warns that cloning large datasets can cause the database transaction log to grow significantly and recommends shrinking the database after the operation completes.
Entity Delete
Delete an entity and all its data using the delete button (trash icon) on any entity in the Models list.
This is a destructive operation with a two-step safety check:
- Domain usage check — If other entities reference this entity as a domain source, the dialog lists all dependent attributes and derived columns so you can assess the impact
- Name confirmation — You must type the exact entity name to enable the delete button
Real-time progress tracking — A progress bar shows each deletion phase (attribute values, approval rows, entity rows) with a percentage and running count (e.g. "45,000 / 200,000 items deleted"). Data is deleted in batches of 50,000 so the operation handles large entities without timeouts.
Transaction log warning — For entities with 10,000+ rows, a blue info box warns that deleting large datasets can cause the database transaction log to grow significantly and recommends shrinking the database after the operation completes.
Purge Entity Data
Remove all data rows from an entity using the purge button (amber trash icon) on any entity in the Models list.
This is a destructive operation with a two-step safety check:
- Warning banner — A red warning explains that all data will be permanently deleted
- Name confirmation — You must type the exact entity name to enable the purge button
Once confirmed, all rows and attribute values are deleted from the database. The entity definition (attributes, permissions) remains intact — only the data is removed.
The purge action is always recorded in the Audit Log with the action type purge and the number of deleted rows.
Data snapshot options
How Primentra handles audit snapshots depends on the type of delete:
| Operation | Snapshot behavior |
|---|---|
| Regular row delete (selecting rows and pressing Delete) | A full snapshot is always saved automatically. Every deleted row is stored as JSON in the audit log — no user action needed. |
| Purge entity data | You choose. A "Save data snapshot to Audit Log" checkbox appears in the confirmation dialog. Unchecked by default. |
| Delete entity | You choose. The same checkbox appears in the entity delete confirmation dialog. Unchecked by default. |
When the checkbox is enabled for purge or entity delete, all rows are captured as a JSON array in the Details column of the AuditLog table before deletion. For entities with more than 10,000 rows, a warning is shown that saving the snapshot may take a moment.
Recovering deleted data
Because snapshots are stored as JSON, you can recover deleted rows without a database backup — by re-importing them directly into Primentra.
Step 1: Extract the snapshot from the audit log
Run the following query in SSMS to retrieve the JSON snapshot. Use Action = 'delete' for regular deletes, Action = 'purge' for purges, or Action = 'delete_entity' for entity deletes:
SSMS truncates long text in the grid view — use Results to File (Ctrl+Shift+F before running the query) to save the complete output, or write it directly with BCP:
Step 2: Re-import the JSON into Primentra
- Save the extracted JSON as a
.jsonfile - Open the target entity in the DataGrid
- Click the Import button in the toolbar
- Drop or select the
.jsonfile - Map columns and choose a conflict action (e.g., Skip existing to only restore missing rows, or Overwrite to replace current values)
- Review and confirm the import
The JSON format matches what the Import wizard expects — each object has code, name, and all attribute display names as keys. No manual transformation is needed.